
Sterlingfest Art and Music Fair, 5-7 August 2010.
Three days of heat, humidity, some rain, and wind.
We had a ball!
Visit our websites: http://photomcgee.etsy.com/ and http://photomcgee.com/
We set up the canopy and grid walls on Wednesday early evening in about an hour and a half. Then headed to dinner to celebrate. Thursday morning at 0730, I arrived with the car full of framed and matted photos. Since a couple of frames were a little large, I had to put the convertible top down to transport them. Good thing it wasn’t raining.
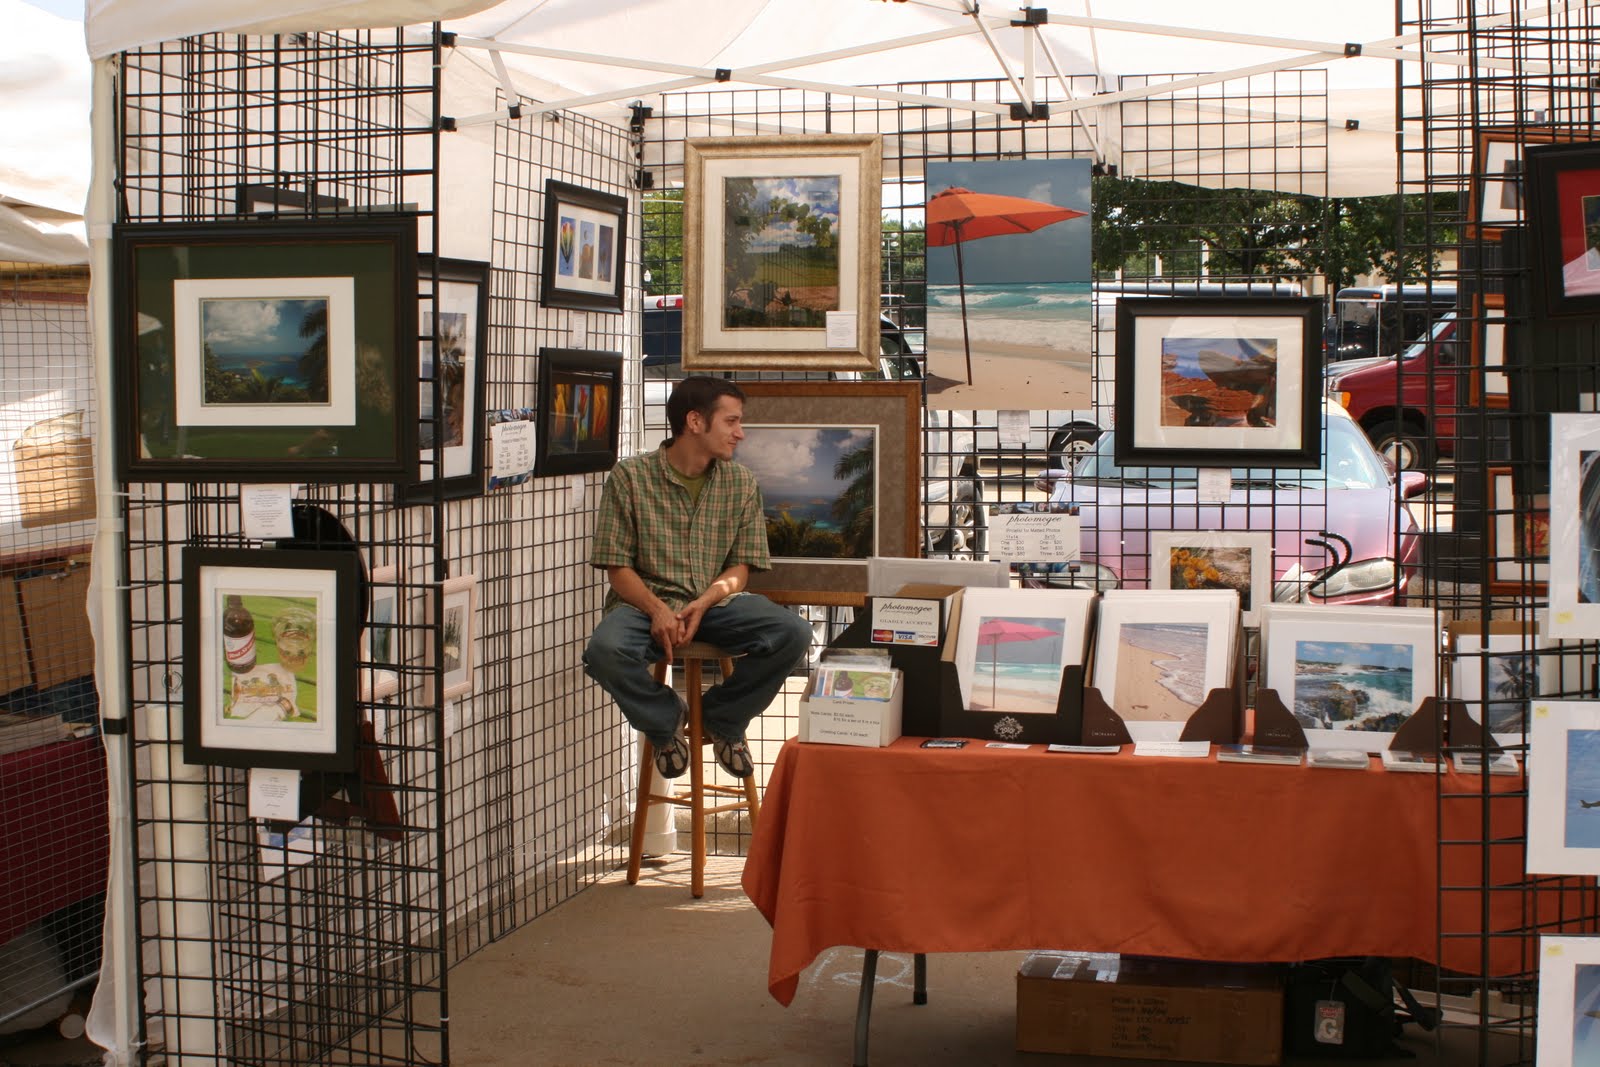
By the 10 am deadline, we had framed photos on the grid wall, and matted photos in containers on the table. It took a lot longer to put up the photos than I thought, and the arrangement looks a little messy. Seeing the cars behind the booth also adds to the messy look, but leaving the back flap down cut down on the airflow and made it REALLY hot in the booth.
Each of the photos had a "paragraph on the back of each one explaining what each one was" :)
We created cardstock labels with the description and price of each framed photo and taped them from the back of each frame. Those same descriptions were placed on the back of each matted photo. It was surprising to see many customers reading the descriptions on the back. They seemed to enjoy the stories.
Here's the booth all set up:

Me in front of it

After watching the crowd, we changed the arrangement to show more of the matted photos from the street. Immediately saw increased traffic. That's my youngest son manning the newly arranged booth.
We had a good reaction from most people. The most popular framed picture was Tropical Serenity. It’s a 16x20 photo matted and framed to 20x24. It drew people into the tent.
Comments heard the most: “I would love to be there right now”. And “did you take all these?”
 |
| Jamakin' Me Thirsty |
Best seller: Jamakin’ Me Thirsty, followed by Trilogy of Wine. Seeing a trend here?
Worst comment of the weekend by a lady who was flipping through the photos with an attitude: “Am I going to see these when I go to Michaels tomorrow?”. I’ve thought of many comebacks to this one in the last couple days!!
One of my favorite customers. My grandson Owen showing us his favorite balloon.
 |
| Owen |
 A couple mishaps. Hubby and photography partner fell off the barstool! We had a high stool in the booth to rest our weary feet and he twisted his ankle under him when got off. Swelled up like a balloon. Sterling Heights police and the EMS on bicycles were wonderful! They checked him out, wrapped it up, and came back several times to check on him. A special thanks to the Sterling Heights emergency force.
Also, one framed photo fell off the display and broke. We didn't have the frame well mounted.
Did we make any money? Well, considering the booth fees, materials, and hours spent preparing, setting up, and working the fair – No way.
Not the most cost effective way to spend the weekend.
Would I do it again? At this venue, you bet! The Sterlingfest is well-run, and the staff friendly and helpful. Mary came around often to make sure we were happy, and other staff checked in on us often. They even offered booth sitters in case we needed a break.

All in all a great experience. Thanks Carrie and Earl for all the help. Thanks to my family and friends who braved the heat and crowds to come see us. To all of you, and to the city of Sterling Heights employees – Thanks – You Rock!
-----------------------------------------------------------------------------------------------------
Here’s a list of considerations if you are doing an art fair:
Facilities: The first thing to think about, besides your product of course is the facility and structure.
Size of space – will your canopy fit.
Surface (cement, asphalt, grass, etc) (ours had a curb in the back which we didn’t expect)
Is electricity available? Some charge extra
Is WIFI available? Helpful if you want to process chargecards.
Your set-up
Canopy: This is probably your largest expense; and we borrowed one from family. This was a huge advantage (plus they helped set it up!!) Practice putting it up ahead of time. Had my brother-in-law not had experience, we would have been very frustrated.
Sides: Very important, especially considering potential weather issues. Most canopies have optional sides, at extra cost of course. Our borrowed canopy had sides. YES!!
Again, practice putting them up.
Weights: Can’t stress this enough. The display down the way from us didn’t have weights, and the canopy lifted in the wind. They were selling painted wine glasses! Fortunately with this help of those around, they only lost one glass. They headed for the store to buy cement blocks after that.
We made four 35 lb weights using 4” PVC pipe, 8 caps, four eyebolts, eight nuts, eight washers, two bags of Quickcrete, and glue.
We bought a 10’ length of 4” PVC pipe, and cut it to four 2.5’ sections. Glued one cap onto each of the 4 cut pipes. Drilled a hole into remaining four caps, and prepared each cap by putting eyebolt through hole, and slipping on a washer, nut, washer, and nut. Left the bolts screwed at the bottom end of the eyebolt to help grip the cement when capped. Filled pipe with dry cement half way up and added water, and mixed with broomhandle. Repeated until cement was at the top. Quickly wipe cement off pipe, spread glue on pipe and inside of eyebolted cap, force cap onto pipe. Again, quickly. The glue dries really fast. I ended up using a rubber mallet to force the cap onto the pipe and force the eyebolt down into the cement. Big pucker factor getting this last step right. This worked very well. Our method for holding the pipe upright failed miserably.
I’ll just say that putting up all four pipes around a stool and bungy-cording them together is NOT recommended
 |
| PVC Weight |
Surface for your product. We sell photographs so that’s where I’ll focus my attention. We used metal grate. We used ten 2’x8’, four 4’x8’, and three 4x6’ sections and ziptied the sections together. We arranged it so there were triangle towers in the front corners for stability, a right angle in the back left, and a doorway to get out the back right. Again, I recommend you put it up as a practice before your event. We didn’t, and it took us a while to figure out how we wanted it to go. Consider the height of your grates and the height of your canopy’s braces. The 8 ft sections wouldn’t fit under some of the braces. We added a 2' extension halfway back along the right wall to block the view of the back doorway. Not sure if I'd do it again - it kind of blocked easy customer movement.
Product Displays
Wall display: We just didn’t have enough framed material to fill the walls. So we hung matted photos on the walls along with the framed. If we're going to hang matted photos, we need a better method.
Table Display: One 2.5x6 table covered with a tablecloth. We matted 90 different 8x10 photos to 11x14, and 72 5x7’s to 8x10. For the display boxes, we visited office supply stores and asked them for empty cardboard display boxes. We got black and brown boxes that were cut at an angle, and it worked nicely. Not the best looking display solutions, but this was our first show, so we wanted to keep the costs low.
Cards: We offered a boxes of eight cards, and put them in front of the matted photos. We also offered individual cards and put them in a small cardboard display box. Probably not the best method of display, but again, keeping costs down was a factor.
We arranged the 6’x2.5’ table several times. Against the side wall didn’t provide enough surface space. Lengthwise from back to front gave us good surface space, and booth space, but as we watched customers from across our booth, we noticed they couldn’t see the photos as the walked by. So we moved the table so it ran lengthwise from the right wall, left. Immediately saw more traffic, since photos caught their eye as they walked by.
Matted photos process: Most of our printing came from whcc.com. We bought the white mats and backing at goldenstateart.com. They offered free shipping for 100 of each size; and they shipped quickly. We hinged the mat backing to the mat to create the mat package, then used the T-hinge method for mounting the photos in the mat backing. We created weights to hold the photo in place using a balloon and sand. My favorite tape has been the pH neutral tape that looks like masking tape.
Framed photos: We bought most of our frames from Michaels a little at a time for the past 3 months as they went on sale. Garage sales netted several really nice frames.
Taking Charge Cards: I signed up for Propay at $29 for a year. Worked like a charm. I used a knucklebuster and charge card forms (again, borrowed but you can get them on ebay). I ran the customer’s card through the knuckebuster, wrote “photomcgee” on the front of the form, checked the expiration date, added the amount, and the customer’s zip code (that’s what propay requires). Then that night or the next morning, I entered the information into the propay site from home. I also used the phone method for a few of the sales. The phone method failed once, but it may have been operator error because the sale went through that night from my computer.
Lessons Learned: We needed more framed photos. Find a better way to hang some matted photos. Plan the locations of each of the framed photos.
More shots of the booth.
 |
| booth from back |
 |
| back wall |
 |
| view of side wall with extension |
Grosse Pointe "Art On The Block"
September 11-12, 2010
rain, rain, go away
We dealt with great temperatures, but a great deal of rain on Saturday, so it was almost like a one-day sale.

Inside looking out
The rain caused a multitude of problems. Unfortunately, the canopy roof leaked - apparently most of them do. Fortunately it started to leak while we were there, so we took all the framed photos down and put them under a tarp overnight. (Yes, bring a tarp just in case) The rain was also collecting on the roof, so we used the pole we brought to push the water off. Be mindful of customers and vendors around the tent when you do this!! For some reason, the canopy became stubborn at the end of the day, and we just could not zip it up. By then, it was pouring rain, we were soaked and cold, so we wrapped it up the best we could using the velcro and went home.
We made up for our booth fee. We had fun! More next year!

Mick looking inviting?

Inside front corner
 |
| from outside the booth |

No comments:
Post a Comment